CNN – Initial Pattern Detectors example with Simple Python
Python Simulation Template (No Deep Learning Library)
Here’s a simple Python simulation that applies a kernel to a 2D grayscale image:
import numpy as np
from scipy.signal import convolve2d

# Simulated grayscale image (6x6)
image = np.array([
    [10, 10, 10, 0, 0, 0],
    [10, 10, 10, 0, 0, 0],
    [10, 10, 10, 0, 0, 0],
    [0,  0,  0, 20, 20, 20],
    [0,  0,  0, 20, 20, 20],
    [0,  0,  0, 20, 20, 20]
])

# Horizontal edge detector (Sobel Y-like)
kernel = np.array([
    [1,  2,  1],
    [0,  0,  0],
    [-1, -2, -1]
])

# Apply convolution
output = convolve2d(image, kernel, mode='valid')
print("Convolved Output:\n", output)
Final Tips:
- Start simple: Use edge/corner detectors like Sobel, Laplacian, and Harris corner detector.
- Use domain-specific knowledge to create initial kernels if needed (e.g., detecting stripes, curves).
- Let CNN evolve from handcrafted to learned filters — the beauty of CNNs is that deeper layers learn complex patterns on their own.
Corner Detector
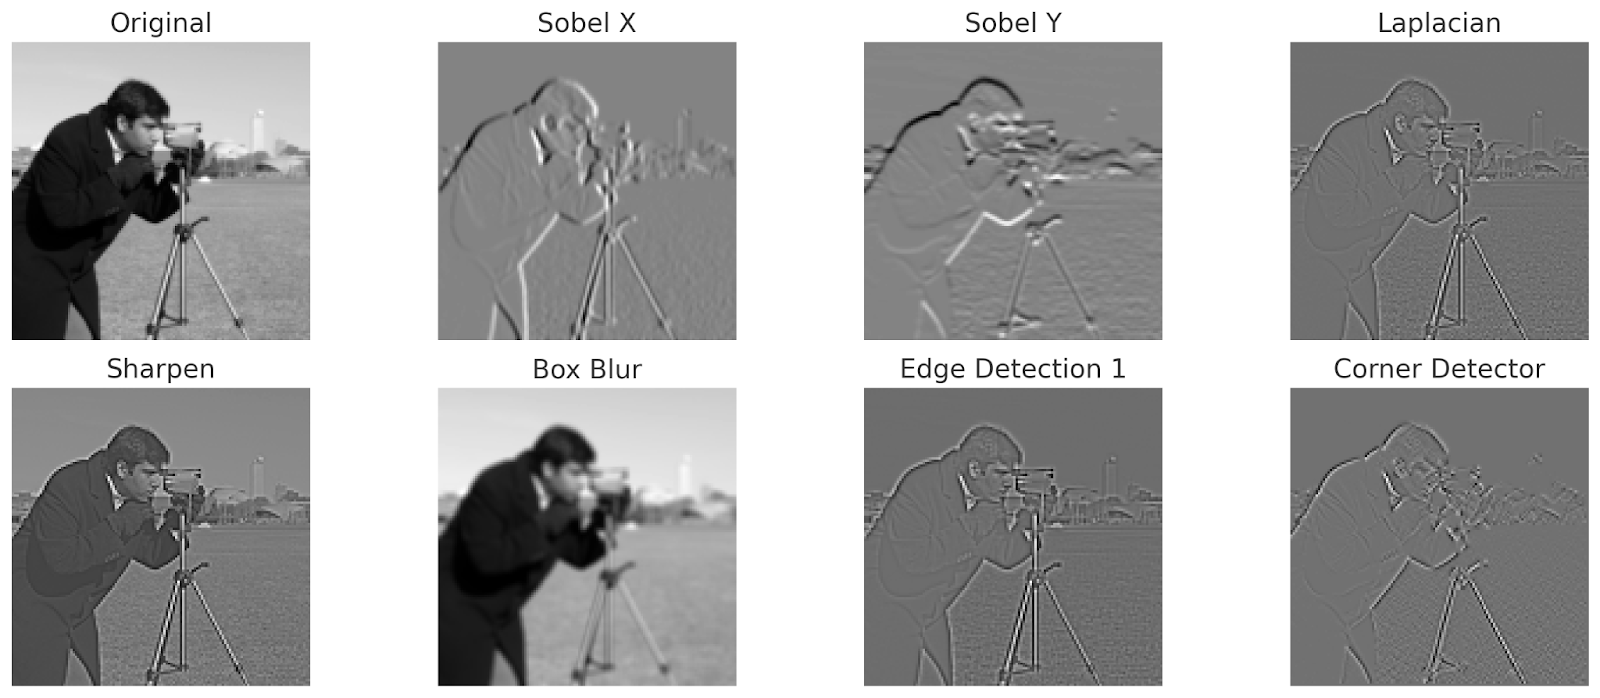
Here’s the output image grid showing how different initial CNN kernels (filters) affect a sample grayscale image:
- Original: Base grayscale image (resized camera).
- Sobel X / Y: Highlights vertical and horizontal edges.
- Laplacian: Captures edges from all directions.
- Sharpen: Enhances edges and contrast.
- Box Blur: Smoothens the image evenly.
- Edge Detection 1: Strongly outlines object boundaries.
- Corner Detector: Responds to intersection-like patterns.
CNN Initial Filter Visualization in Python
import numpy as np
import matplotlib.pyplot as plt
from scipy.signal import convolve2d
from skimage import data
from skimage.transform import resize

# Load and resize the grayscale image
image = data.camera()  # Already grayscale
image = resize(image, (128, 128))  # Resize for faster visualization

# Define a dictionary of common CNN kernels
kernels = {
    "Sobel X": np.array([[1, 0, -1],
                         [2, 0, -2],
                         [1, 0, -1]]),

    "Sobel Y": np.array([[1, 2, 1],
                         [0, 0, 0],
                         [-1, -2, -1]]),

    "Laplacian": np.array([[0, -1, 0],
                           [-1, 4, -1],
                           [0, -1, 0]]),

    "Sharpen": np.array([[0, -1, 0],
                         [-1, 5, -1],
                         [0, -1, 0]]),

    "Box Blur": np.ones((3, 3)) / 9,

    "Edge Detection 1": np.array([[-1, -1, -1],
                                  [-1, 8, -1],
                                  [-1, -1, -1]]),

    "Corner Detector": np.array([[1, -1, 0],
                                 [-1, 1, 0],
                                 [0, 0, 0]])
}

# Apply each kernel to the image using 2D convolution
filtered_images = {}
for name, kernel in kernels.items():
    filtered = convolve2d(image, kernel, mode='same', boundary='symm')
    filtered_images[name] = filtered

# Plot original and filtered images
num_filters = len(filtered_images)
cols = (num_filters + 1) // 2
fig, axes = plt.subplots(2, cols, figsize=(15, 6))
axes = axes.flatten()

# Display the original image
axes[0].imshow(image, cmap='gray')
axes[0].set_title("Original")
axes[0].axis('off')

# Display each filtered result
for i, (name, filtered) in enumerate(filtered_images.items(), start=1):
    axes[i].imshow(filtered, cmap='gray')
    axes[i].set_title(name)
    axes[i].axis('off')

plt.tight_layout()
plt.show()
Required Libraries
Make sure we have these installed:
pip install matplotlib scikit-image scipy